HELLO and welcome! Free Tutorials - learn how to make the projects on this blog

Scroll all the way down to bottom LEFT SIDE for list of free tutorials.


Showing posts with label scriptures. Show all posts

2009-06-19

Dots, dots, dots!

"Dots" is the theme for this card...can you tell? lol! The dotted flower pot was my inspiration for this theme. So first I went and dry-embossed the brown cardstock using the cuttlebug swiss dot folder. Then I freehanded some pink dots on the white background cs with my pink marker. Here's a close up of the pink dots: I used the "Garden Joy" stamp set. Stamped them, colored them in and then cut them out. I used a teenie pop dot on the top of the flower and on the birdie for 3-d effect. TIP: Use different "portions" of a rubber stamp for greater stamp usage. Notice how I stamped the flower portion of the potted plant on the bottom and top of the white cs to tie it all together. I used a scripture verse from "Inspirational Sayings" for the focal point of my card. Thanks again for visiting my blog. May God bless you with sweet sleep tonite!

2009-06-17

This is what summer is about

....appreciating the beauty that surrounds me...all this beauty compliments of my Heavenly Father! The details in each individual plant is incredible, right? I am totally in awe of such floral beauty that was placed before MY eyes!! Especially the second to the last picture...you have to take a closer look at this one. (Click on the picture for larger view.) The picture is of a white lily but as you take a close look at the inside of the flower it looks as if it is lined in swiss dots...you know like on ribbon or fabric! How awesome is that? I love it!! Reminds me of the verse in 1 Chronicles 16:9 "Sing to Him, sing praises to Him; meditate on and talk of all His wondrous works and devoutly praise them!" And also Proverbs 90:17 "And let the beauty of the LORD our God be upon us" comes to mind. Thanks for sharing your time with me... believing you have an incredibly blessed day!

2009-06-04

Angelee & Natalee Tags - Free Download!

As you know, The Angel Company has free paper downloads for your papercrafting projects...they are located on our website's homepage. Did I tell you they were free? Free! That a good word, right? This freebie, Angelee & Natalee Tags, has such a soft look to it and I immediately thought it would look great with the color brown. Here's what I did with it:
First I downloaded the tags. TIP: Since the colors of the tags are on the soft side, I printed them on glossy cardstock instead of a matte cardstock. The ink stays on top of the glossy paper and will be more vibrant looking than if I printed it on matte cardstock (it would absorb the ink lots more!). I cut out the tags.
For this 8x8 sb layout, I added some brown cs with scalloped edges to the left of my background paper.
Tip: To make a "linen" look background (see picture below), I took my Brilliance pearlescent pink inkpad and swiped it on the white cardstock horizontally and then vertically. Sorry the picture is not the best to see the details. Click on picture for close-up view though. You can see the shimmer of the ink a bit better on the corners of the paper. (It looks much better IRL.) I then stamped the rubber stamp image from the "Swirlies" stamp set to complete my background paper.
I proceeded to stamp on the tags. Stamped & colored the "True Beauty" butterflies, added ribbons and a charm . I was then ready to assemble my, very simple, brown and pink butterfly sb layout for the final product: It's your turn, now. Go get your free TAC paper tags download! I'd love to see what you did with yours. Notice the new download next to it....paper dolls! Gotta try that one too soon.

Thanks for dropping by....may you have a joyous day!

2009-02-11

Love Heart

Hello everyone! This quote really blessed me today and so I wanted to share it with you..."Where love reigns, God reigns." It reminded me of Mark 12:30 and I thought I would use this verse as the focal point of my Heart card. Thanks for coming over today and visiting!

2008-05-28

Cute Baby

A sweet and simple baby card. I used "Twins" stamp set and non-TAC patterned paper. What a great verse of scripture, huh?

2008-04-13

"Words of Encouragement" ATCs


Sorry for my absence....have been on vacation to sunny Florida, well mostly sunny... two days it was raining but who cares, huh? when you're having fun!


Wanted to share a few "words of encouragement" ATCs I made last week. My penmanship on the little penguin (isn't he a cutie?) is not quite the best. It should read "Keep lookin' at the Lord, He'll carry you through"...now there's a wonderful thought to hold on to, huh?

For newbies, ATC stands for ARTIST TRADING CARDS and they are only 2-1/2"x3-1/2" in size. Yes, your canvass is small which can make ATCs challenging for that reason but they are SO much fun to make! I will show you some more later using different techniques...so please come back and check them out!


The Angel Company stamp sets used:

"Butterfly Swirls" T2929

"Fluffy Friends" TB2841 Level B hostess set

"I Love Easter" T2719

2007-07-16

Monday Mom Tip

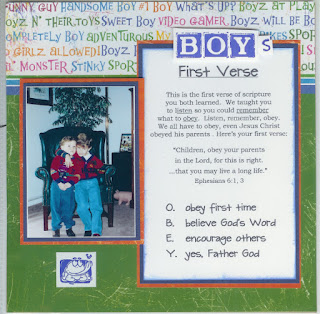
For you Blogamamas, my tip is "teaching kids 'obedience' according to God's Word." This scrapbook layout shows what we taught our boys when they were little (and now, too, of course.) They can then pass this teaching on to their children and reap the benefits of it. Of course we know their is no guarantee for obedience but as a parent I'm doing my job to teach them the truths in God's Word to follow.

This layout is very simple so it didn't take long to do. I used "Kaleidoscope Boyz" paper and "About a boy" stamp set:


2007-07-13

Tutorial - Coaster Photo Key Chain

Click on picture for larger view so you can see the "vinyl trading card sleeve" a bit better on the right side on coaster.

This was one of the swaps I made for our TAC seminar last month and was asked how I made them. It's really easy & fun! I used 4x4" chipboard coasters and did as follows:

-Ink a brayer with Kaleidacolor "Bouquet" rainbow ink and brayer the color onto the coaster - both sides.

-Pick a verse from "Scriptures" stamp set and stamp it with black ink on the left hand side. (MY FAVORITE SET - I USE IT ALL THE TIME!)

-Stamp flowers here and there from the "PetalPack" stamp set and color in with Tombow markers.

-Ink the "Speckle" stamp with Palette Landscape inkpad and stamp here and there over design.

-Ink the edges of the coaster with pink inkpad.

-Now you will SEW a "trading card vinyl sleeve" on the right side of coaster. (These are the vinyl sleeves the kids get for their Pokemon or baseball cards.) Remember only sew 3 sides leaving the top open to slide your stuff in. You will be sewing green rick rack on left side of vinyl sleeve.

-Adhere the rhinestone to the center of the big flower ON TOP OF THE vinyl sleeve.

-Punch a hole on top left corner & add a key chain, ribbons etc. For the circle picture, I punched the picture from a 2" circle punch and then layered it onto a 2-1/2" scalloped circle punch.

This can be used to hold your special photos, your business card, gas card or retemories (bible verses you're memorizing.) Makes a quick, fun and inspirational gift. Enjoy!

You may purchase my cards and artwork

at my "Paper Blessings" ETSY Shoppe.

Copyright

All content, including text and pictures is ©Mary Leeson and is intended to be used for personal inspiration only and may not be copied for publication or contest submission. Thank you so much for visiting us!