HELLO and welcome! Free Tutorials - learn how to make the projects on this blog
Scroll all the way down to bottom LEFT SIDE for list of free tutorials.
2007-06-27
Going to Kansas City
for our annual The Angel Company seminar! I'm so excited. I was invited to teach a "Faithbooking" Class for this awesome event! I'll be back in a week to share some of the artwork I used for this presentation. Keep me in your prayers that I'll bless the ladies with my stuff!


2007-06-21
Make Your Own Wedding Layout - Two Better Than One

June is the month for weddings - yeah! Here's a quick scrapbook layout you can bless someone with when you don't have so much time on your hands and you have a wedding gift to give. Here's how to make this:
-I used an 8x8 sheet of the "Rustic Chic" Wing It paper collection. All I did was layer the picture to the cardstock that has "Two are better than one...a three-fold cord is not quickly broken" printed at the top of it.
-I added the braided ribbon to symbolize the "3-fold cord" which represents the husband, the wife and God at the center of the marriage relationship from Ecclesiastes 4:9-12.
-I added the "two hearts" silver charm to the ribbon to represent the couple.
-I edged the paper with "Cognac Brown" pallete inkpad to give the page some depth.
-That's it. How quick and easy,huh?
Click on picture for a larger view of the layout. Click here for my TAC online store where you can find highlighted and other TAC items.

Labels:
make your own,
ribbon,
rustic chic,
scrapbook page,
TAC,
TAC online store,
wedding
2007-06-01
Make Your Own Coaster Purse/Totes
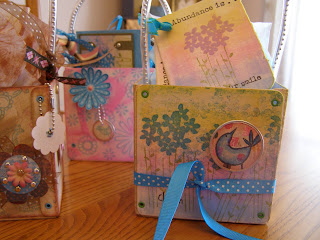
How about these Coaster Purses/Totes? Here's a really cool way to use chipboard coasters - make a purse and fill it with matching photo boards or matching cards or whatever will bless you!

You are welcomed to make these for personal use but please do not submit as your own original work for magazine submissions or contests. I'm sure you can relate to that, huh?
You will need 5 of the 4"x4" coasters. Here's how to make them:
-Ink your brayer with Pastel Kaleidacolor rainbow (5 colors) inkpad and brayer in color to your coasters as your background.
-Stamp your favorite theme. I used "basic birds" and "abundance is" rubber stamp sets here.
-Color in your images with Prismacolor pencils.
-Use a cosmetic sponge to ink the edges of the coasters with Palette "cognac brown" inkpad.
-Take two of the coasters. Each one will be creased at 1/4" of its two sides. Sand lightly where needed. Drop down to the SLIDE SHOW for a better view of the 1/4" creases.
-Aligning and holding a "creased" & an "uncreased" coaster together, with a Cropodile I punched holes at each corner.
-Aligning and holding these two coasters together, set the eyelets at the corners.
-Cut a 14" piece (or whatever size you desire) of refrigeration vinyl tubing.
-With Cropodile, punch a hole on each side of tubing, about 1/4" from each end and insert "ball chainz" into the tubing.
-Punch a hole at center top where you will insert a large brad in thru the coaster and the vinyl handles. Again, go to the SLIDE SHOW for a better view of this.
-You will use the 5th coaster for the bottom of the purse. I used "Yes!Glue" to adhere it to the bottom and it worked wonderfully.
Click here for my online store where you can find highlighted and other TAC items. ny questions, please leave a note. Enjoy making these as gifts!
Here's a slide show of them:

Labels:
abundance is,
basic birds,
coasters,
cropadile,
eyelets,
flowers,
make your own,
purse/tote,
TAC online store
Subscribe to:
Posts (Atom)
You may purchase my cards and artwork
at my "Paper Blessings" ETSY Shoppe.
Copyright
All content, including text and pictures is ©Mary Leeson and is intended to be used for personal inspiration only and may not be copied for publication or contest submission. Thank you so much for visiting us!

