HELLO and welcome! Free Tutorials - learn how to make the projects on this blog

Scroll all the way down to bottom LEFT SIDE for list of free tutorials.


2007-04-30

May Stamp of the Month


Introducing the girls of the "Simply Beautiful" 4-stamp set! This May Stamp of the Month set may be purchased at the discounted price of $6.95 ($10.95 retail value) with a $30 purchase. Remember, also, that you receive one free GWP(gift with purchase)stamp with every $30 purchase. Wow, huh? I will be taking orders thru phone or email.

2007-04-23

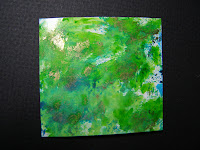
Make Your Own Marbelized Paper

I went to a rubber stamp convention this weekend (Oh, Hello Sue, Awna, Beth, Michelle! Did we have fun or what?) and I was reminded how much I use to enjoy making my own "marbelized" background paper. Since I hadn't made any in awhile, I wanted to share with you what I made today. (Click on picture for detailed look):


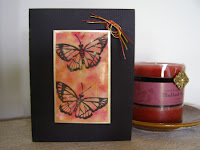
I used this background paper to make this greeting card:


Here's how I made them:

-First, make your own applicator by velcro-ing (is there such a word?)a piece of white felt material to a rubber stamp wood mount (the ones we have left over AFTER we convert our mounted stamps to the quick & easy unmounted Creative Cling system)

-Using alcohol inks: dot 2-3 colors of alcohol ink on your applicator. Pat this on your White Glossy Cardstock, using up & down motions. Then dot 2-4 dots of gold from your
Krylon Leafing Pens on top of that. The gold leafing will begin to separate and you'll begin to see that "marbelized," veining look. Again, pat gently, up and down, sideways til you get the desired look.


-Using TAC Palette reinkers with regular alcohol.

Take your applicator and dab alcohol on it first, then dot 2-3 reinkers on top ofthis. Pat this on your glossy cardstock. Then add your dots of gold leafing and do same as above. It's that easy!! You can look at these pictures to help you out:

2007-04-18

Make Your Own Button Embellishments


Last week I said I'd post on how I make my own buttons/embellishments. Above is a card with one of the buttons I made - click on it to see details. The picture below is where I got my "inspiration" ideas:


These are the buttons I made:


These are the two together to compare:


Here's how I made them:

- Cut a circle, square, flower or whatever button shape you want, using a paper punch or die cut machine, from chipboard or heavy cardstock. I used the Marvy circle punch and the Cuttlebug die cut machine for the square.

-If you want to cover them with patterned paper, glue the paper to the chipboard first & then cut. If you're doing just ONE at a time, cut the patterned paper along with the chipboard so everything matches up. I used "Sands of Time" & "Genevieve" patterned papers.

-I Adhered the patterned paper with Yes! Glue. This stik flat glue is specially designed for journals, bookbinding so it sticks really well but you could use your favorite adhesive.

-Or, you can stamp directly on the shaped chipboard, color in with Prismacolor pencils or Gelly Glaze pens.

-Punch two 1/8" hole at the center for the ribbon. Optional: crimp two eyelets to holes.

-Ink the edges with Palette dye inkpad using a cosmetic sponge.

-Thread ribbon, scrapper's floss, raffia etc. thru the holes.

-Optional: For a quick 3-d shiny look, cover the button surface using the CLEAR pen from "Gelly Glaze" Pen set. Or, stamp some embossing ink on the surface, sprinkle CLEAR embossing powder over it and then emboss. Crystal Lacquer works even better when you have time to let it dry!

Let me know if you have any questions on anything I covered here. More examples here:


2007-04-09

I ThanK God for . . .


Click on picture to see details. Used "Genevieve" paper and "Seeds of Blessing" stamp set using Prismacolor pencils to color in.

See Me on "Take 3"

Well, not me but my scrapbook page! Click "Take 3" which is part of TAC's Creative Corner. Take 3 is where three designers use the same photo and TAC materials and then allowed to design a project their own way. I had lots of fun using the "Hip Hop" paper collection since I was able to use at least 3 sheets on my scrapbook page layout for "IZEK." On one of the sheets I cut out the frogs and used them as embellishments! The paper is very versatile. To make the frogs look more dimensional, I took the "CLEAR" pen from the Glaze Gelly Pen set and coated the frogs with it. Gave it a really neat look. I use the Clear Glaze pens ALOT for a quick 3-D look!! In fact, I'll be posting here soon on how to make your own embellishments out of chipboard. Come back & see me! thanks again.

You may purchase my cards and artwork

at my "Paper Blessings" ETSY Shoppe.

Copyright

All content, including text and pictures is ©Mary Leeson and is intended to be used for personal inspiration only and may not be copied for publication or contest submission. Thank you so much for visiting us!